Full Tutorial on Sharing Apple Music Library/Playlists/Songs with Family or Friends
What better way to connect with friends or family than to share your music, playlist, or entire library. Interestingly, Apple Music lets you share your songs and playlist with others, but it may not be immediately obvious.
This guide is here to help and teach you how to share Apple Music with family or friends. Makes no difference if you want to share your entire music library or send individual songs or playlists via social media, messages, email, or the Apple Music app itself — this article will cover everyone’s needs. Even better still, whether you’re on iPhone, iPad, or Mac, you’ll find simple and step-by-step tutorials.
How to Share Apple Music Library with Family or Friends
To share your Apple Music library with family members or your near ones, you can simply share your Apple Music login credentials. Before this, you first have to sync your library so that your downloaded songs and even iTunes purchases will also be accessible on your different devices (up to 10 devices here).
Steps to Sync Your Music Library on iPhone or iPad:
- Open Settings app.
- Scroll down and tap Music in the apps list.
- Enable the Sync Library toggle.
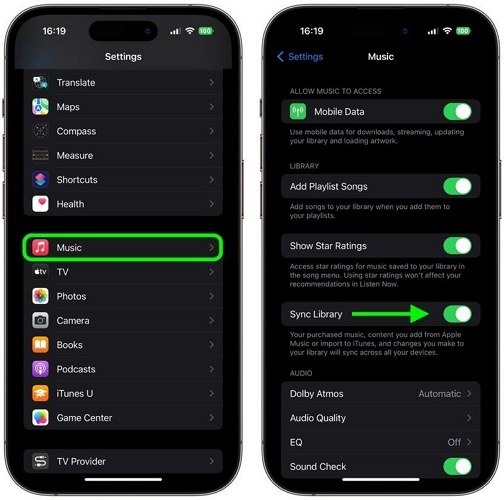
Once you enable the sync, all the playlists, music purchased via iTunes, all will be made available in the cloud. And your family or friends can access your Apple Music library on their iPhones. Here’s how:
- Run Settings on iPhone or iPad.
- Tap on the name at the top.
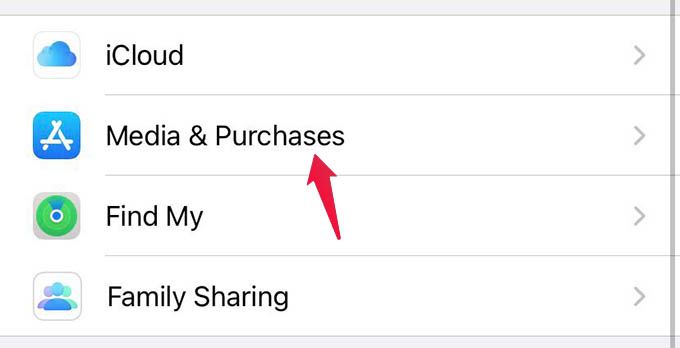
- Select Media & Purchases.
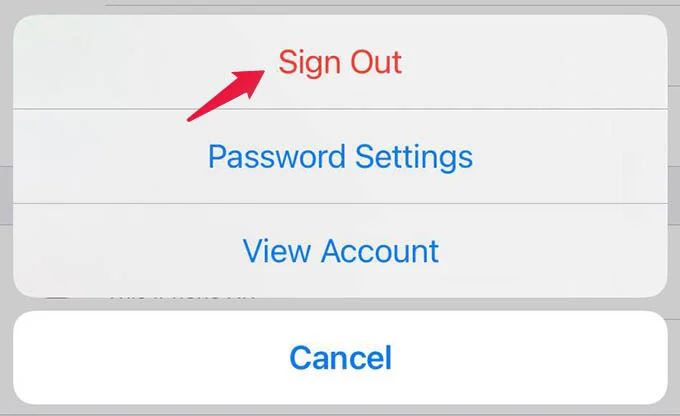
- Choose Sign Out from the pop-up menu and confirm when prompted.
- After signing out, tap Media & Purchases again.
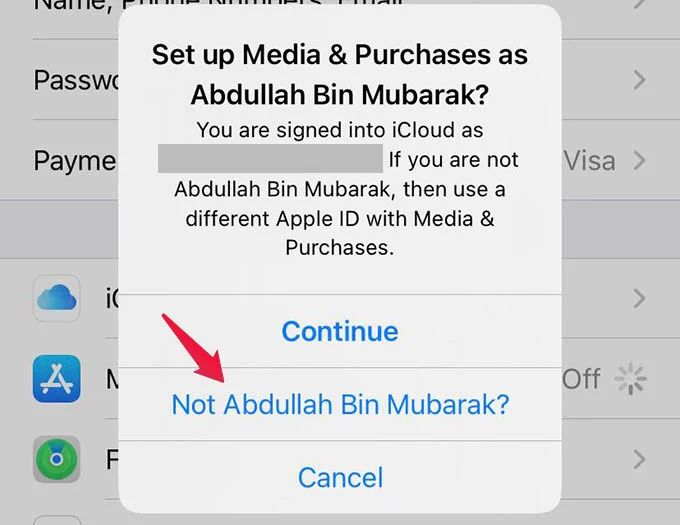
- Now, the iPhone will ask them to continue with the same Apple ID. Instead, they can select “Not [Your-Name]?” from the options.
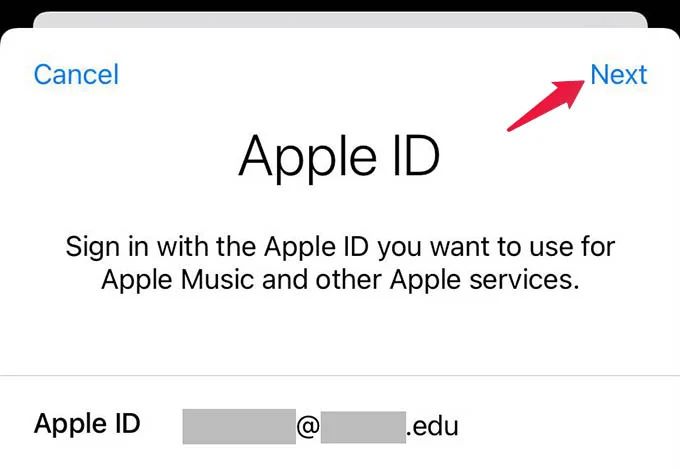
- Tap Next and sign in using your Apple ID to use Apple Music.
Steps to Sync Your Library via Mac and Share the Apple Music Account:
Turn On Sync Library on Mac:
- Launch the Music app on Mac.
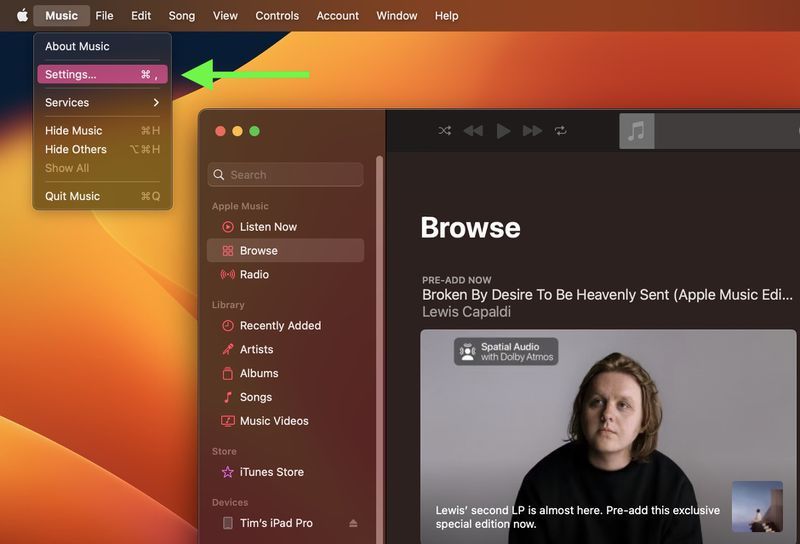
- From the menu-bar, click Music, then Settings.
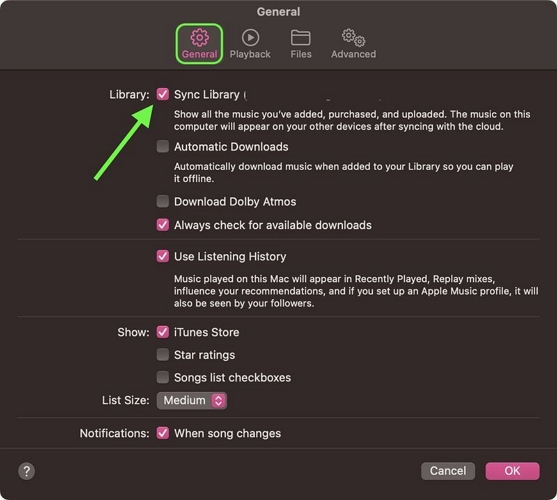
- In the General tab, click on the checkbox for Sync Library, and OK at the bottom to save changes and enable the sync.
Sign in to Apple Music on Mac Using a Different Account:
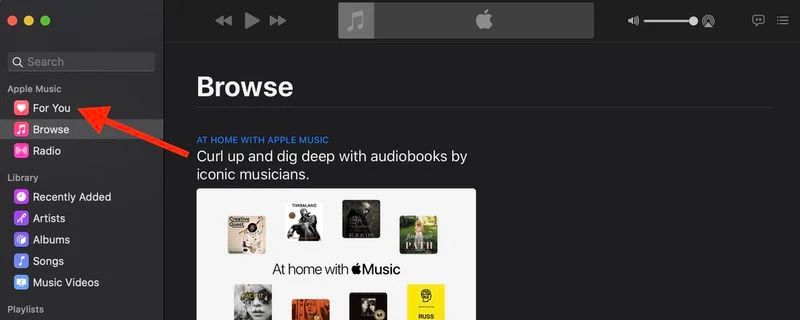
- In the Music app on Mac, click For You from the sidebar.
- Choose Use Existing Apple ID. And ask your friends or family members to sign in using your login credentials.
You can also sign in to Apple Music web player or Windows using the same steps.
How to Share Apple Music Playlists with Family or Friends
For a quick and one-time job, you can make use of the Share Playlist button accessible within the Apple Music app. It will work for all playlists (collaborative, curated, or personal). However, ensure that the playlist is not set to private.
Share Playlists on iPhone or iPad
On the iPhone and iPad, the Music app lets you transfer the playlist to many social media and messaging tools. However, unlike the previous method, you can send one item at a time. Here’s the steps:
- Go to the Apple Music app on your iDevice.
- Open the playlist you wish to share.
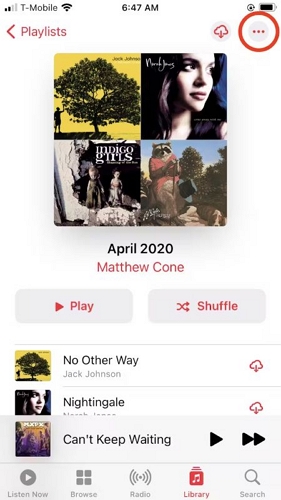
- At the top-right, tap the More (…) button.
- Tap Share Playlist.
- In the share sheet, pick your sharing option such as Messages, Mail, or third-party apps to share the playlist. You can even send the playlist to a contact, copy its link, or use AirDrop to share it with someone nearby.
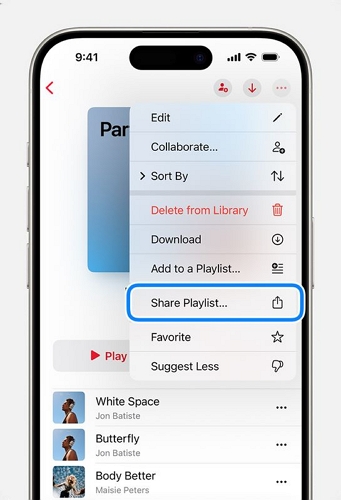
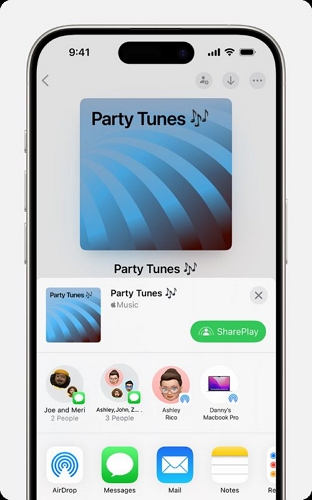
You can follow the same steps when trying to send a playlist via the Apple Music app on Android. However, the sharing options may be limited.
Share Apple Music’s Playlists on Mac:
Sharing the playlist is also possible on Mac, but you will not have as many channels as on the iPhone. Still, it is best if you are looking to share Apple Music playlist and songs to an email, copy the link, or embed it on your blog. Here are the steps:
- Launch the Music app and select the playlist from the sidebar.
- Click on the ellipsis (…) icon, then choose Share Playlist.
- Pick your sharing option.
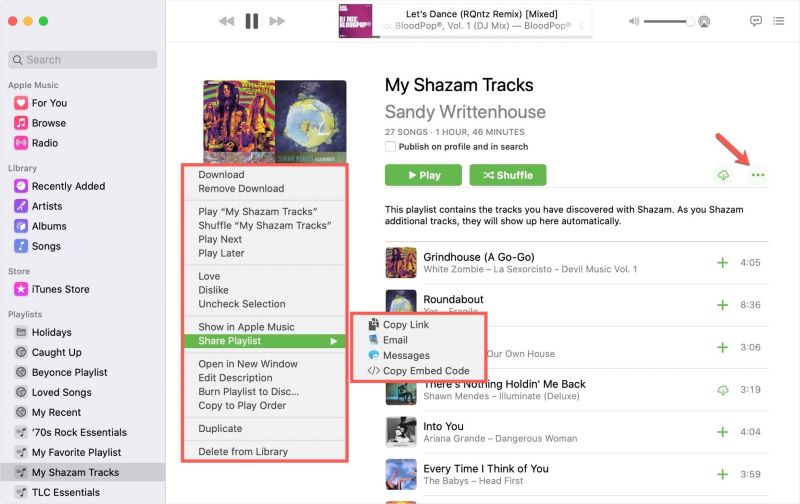
It goes without saying. Repeat the same steps on the Apple Music app to transfer your playlists with others from a Windows PC.
How to Share Apple Music Songs with Family or Friends
If you don’t want to go through the hassle of copying playlist links or sharing your Apple ID to others, StreamFox for Music’s Apple Music Converter offers a seamless solution.
Put simply, StreamFox for Music makes it possible to download Apple Music songs locally to your Mac or Windows PC in high audio quality. It is integrated with Apple Music web player and makes it simple to browse and select any song, playlist, album, or artist station, no need to waste your time pasting URLs or copying links. Whether you want to share a few songs or download your entire library for offline listening, StreamFox’s 50x download speed lets you do it quickly without compromising on quality.

- Convert Apple Music songs, playlists, and albums in MP3, WAV, FLAC, M4A, etc.
- Automatically organize the downloads and preserves song info (title, cover, etc.).
- Drag-and-drop interface make it simple for even tech illiterates to download and save Apple Music songs.
- Support other music streaming platforms, such as Spotify, Amazon Music, Deezer, etc.
Steps to Use StreamFox to Download Apple Music Songs
Step 1. Download, install and open StreamFox for Music on your computer, and choose Apple Music from the main window.
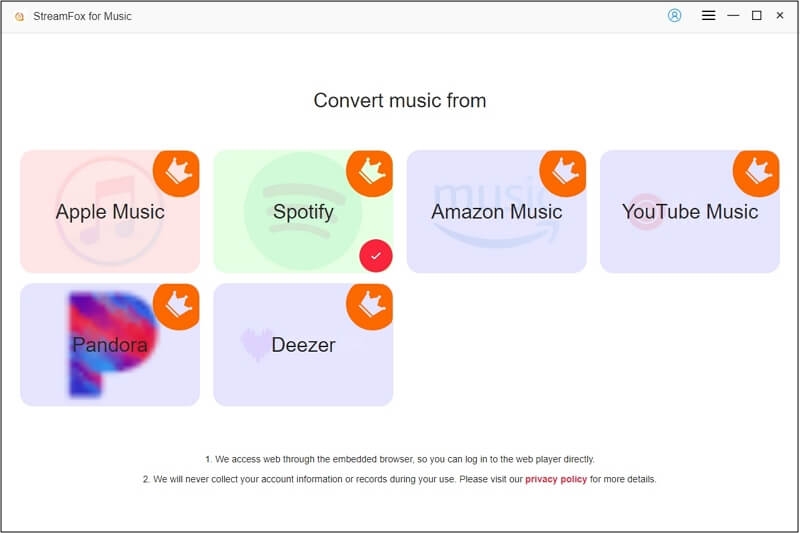
Step 2. Click Sign in at the top-right and log into your Apple Music account.
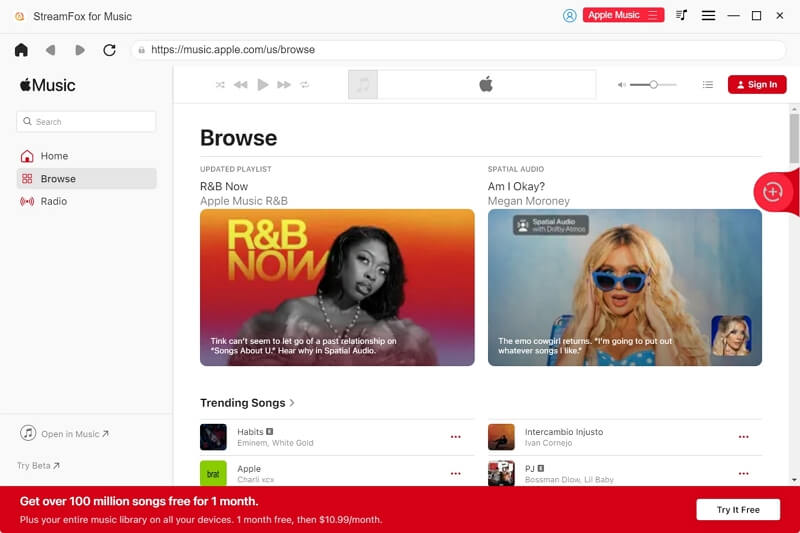
Step 3. Browse the songs or playlists from your Apple Music library. Drag and drop them to the + icon in the upper-right corner.
![]()
Step 4. Once the selected songs are in the Converting tab, you can choose the output format and destination folder (via Browse at the bottom-left).
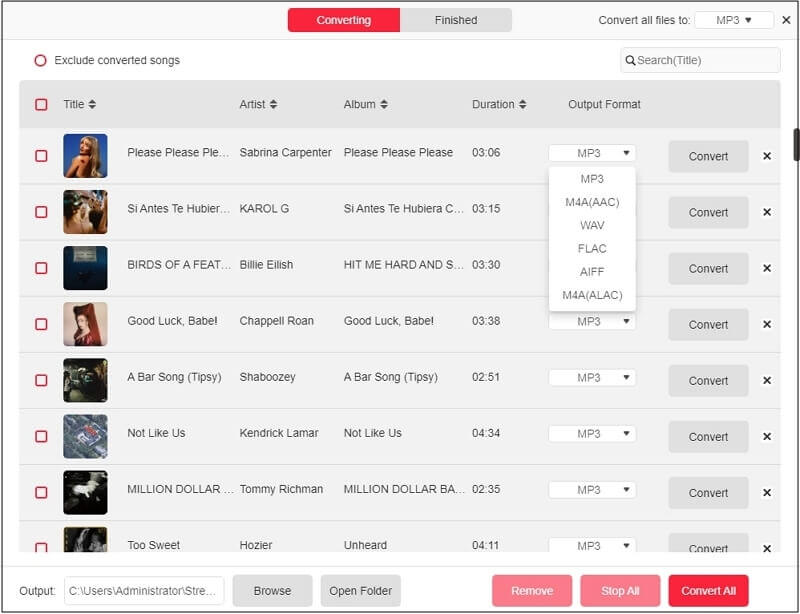
Step 5. Click Convert All to start downloading the selected songs and playlists from your Apple Music library. Once the download completes, navigate to the Finished tab from the top. Click on View Output File of any song to see where the songs are saved on your computer.
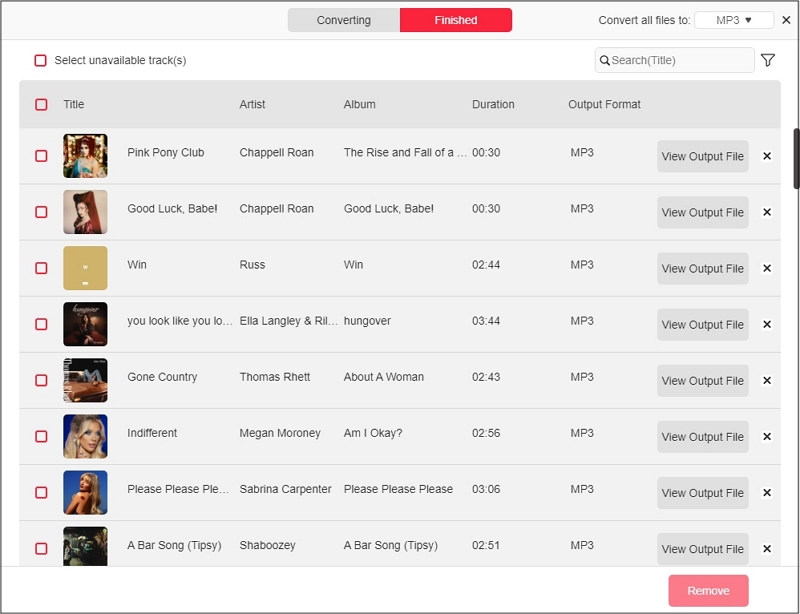
There you go! You can share the downloaded songs from Mac or Windows PC to other devices.
Move downloaded songs from Mac to iPhone
- Open the folder where StreamFox saved the downloaded tracks.
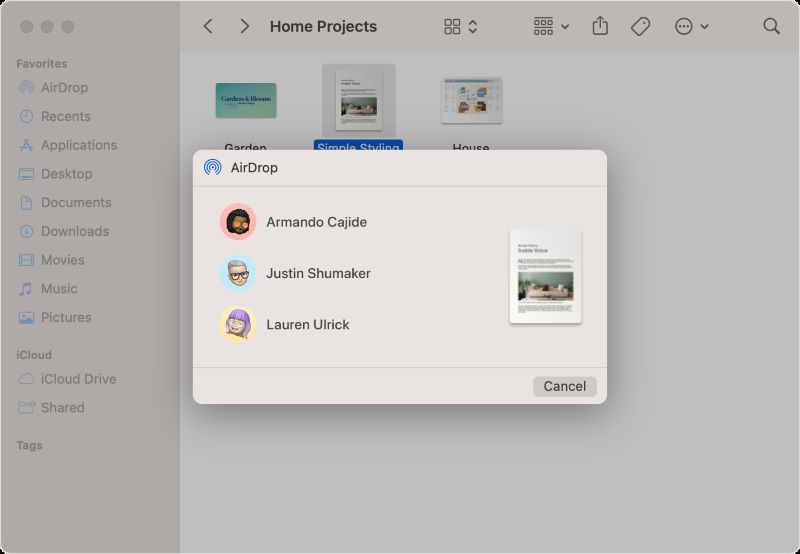
- Choose the desired tracks, then click the Share button in the app window.
- Choose AirDrop from the sharing options listed.
- Select the recipient to start moving the files from your Mac to your family member’s device.
At the same time, if you have downloaded the Apple Music songs to a Windows PC, you can use iTunes or free third-party apps like WhatsApp on your iPhone to seamlessly share the music files with others.
Conclusion
That’s about it! There are many methods to share your Apple Music songs, playlists or even library with your family or friends.
However, if you are looking for the best way to transfer Apple Music audio permanently, as discussed, StreamFox for Music makes it easy to download an unlimited number of songs and keep them forever. Moreover, you are able to transfer Apple Music songs to USB devices or share them with all your family members on any devices, by downloading music with StreamFox.


